ข้อควรทราบของ Virtual Public IP (VIP) บน Windows Azure Virtual Machines กับ DNS

บน Windows Azure ยังไม่มีบริการแบบเดียวกับ Amazon EC2 Elastic IP Addresses ซึ่งเป็นการเช่าชุดหรือเลข IP สำหรับใช้งานกับบริการประมวลผลต่างๆ โดยไม่มีการเปลี่ยนแปลงใดๆ หรือพูดง่ายๆ คือเป็นเจ้าของเพียงผู้เดียว และควบคุมการใช้งานได้ (ถ้าจ่ายเงินไปตลอด)

ซึ่งบน Windows Azure นั้น ตัว Virtual Machines จะใช้ได้แต่ Virtual Public IP (VIP) ซึ่งมีข้อควรจำ (หรือบางคนเรียกว่าข้อเสียก็ได้) ตรงที่จะเปลี่ยนแปลงทุกครั้งที่ Shutdown หรือลบ Virtual Machines แล้วสร้าง Virtual Machines จาก Image Data ชุดเดิม และเราควบคุม VIP ไม่ได้ เพราะฉะนั้น ใช้ A (address record) Type Record บน Zone file ใน DNS ไม่ได้เลย เพราะต้องกลับมาเปลี่ยนตลอดถ้า Virtual Machines ตัวนั้นพังและต้องสร้างใหม่ ทำให้กำหนดการใช้งานผ่าน VIP จะมีปัญหาตอนโยก development/staging machines ด้วย เพราะมันดิ้นไป-มา

แต่แน่นอนว่าคำแนะนำคือให้ใช้ CNAME (alias record) Type Record แทน เพื่อให้ CNAME จับคู่กับ DNS แทนจะทำงานได้ดีก็ตาม (ลบจุดด้อยได้) แต่ก็มีปัญหาต่อมาคือ CNAME มันกำหนด root domain name ไม่ได้ ต้องใช้ A Type Record แล้วกำหนด IP เท่านั้น ซึ่งต้องหาบริการหรือทำ domain forwarding กับตัว root domain name ร่วมด้วย ไม่งั้นทำงานจะมีปัญหาเวลาคนพิมพ์ domain name จาก root เข้าระบบเว็บที่ทำงานบน Windows Azure Virtual Machines ล้วนๆ ไม่ได้

บันทึกสั้นๆ หลังใช้งาน Windows Azure Storage Table

ตอนนี้ใช้ Windows Azure Storage Table อยู่กับบางบางตัว ซึ่งหลังจากที่ใช้งานมา 3-4 วันที่ผ่านมา เอาสิ่งที่ได้มาแบ่งบันกันเล็กน้อย

  • มันเป็น NoSQL database เรื่อง schema โยนทิ้งไปเลย คิดใหม่ทำใหม่หมด คล้ายๆ Excel มากกว่าด้วยซ้ำ
  • มี Data type ไม่เยอะ ทำงานง่ายพอสมควร
  • รองรับข้อมูลที่ใส่ลงไปไม่เกิน 100 TB ต่อฐานข้อมูล
  • สื่อสารกันผ่าน HTTP / HTTPS มี SDK API ให้หลายๆ ภาษาทั้ง .NET Framework, Java, PHP, Node.js, Python ฯลฯ หรือจะติดต่อผ่าน CURL อะไรพวกนี้ก็ได้ แล้วแต่ความถึกแต่ละคน (แต่ผ่าน SDK มันจะง่ายกว่าเยอะมาก)
  • ใน 1 Table สามารถกำหนด entity (row/record ใน RDBMS) ให้มี properties (field/column ใน RDBMS) หลากหลายได้ ไม่จำเป็นต้องเป็น entity ที่มี properties เหมือนๆ กัน
  • entity แต่ละตัวที่ใส่ลงไปได้มีข้อมูลไม่มากเกินกว่า 1MB ต่อ entity
  • properties ตั้งได้ไม่เกิน 252 ตัวต่อ 1 entity
  • properties ที่จำเป็นต้องส่งเข้าไปหรือใช้งานมี 3 ตัวคือ partition key, row key และ timestamp ซึ่ง partition key, row key เราต้องกำหนดเอง ส่วน timestamp ไม่ส่งเข้าไปก็ได้ระบบจะใช้เวลาของระบบแทน
  • ค่า partition key และ row key จำเป็นอย่างมากในการ update/delete ต้องออกแบบดีๆ ค่า partition key เปรียบเสมือนกลุ่มข้อมูล (คล้าย Class) ซ้ำได้ ส่วน row key จำซ้่ำไม่ได้ในแต่ละ partition key เปรียบเสมือน primary key ใน RDBMS ต้องใส่ข้อมูลทั้งสองลงไปเสมอ
  • การส่งข้อมูลออกมาจากการ Query นั้นจะส่งมาไม่เกิน 1,000 entities เท่านั้น ถ้าต้องการมากกว่านั้นต้อง request อีกรอบด้วยการใช้ NextPartitionKey และ NextRowKey ร่วมด้วยในการ Query ครั้งต่อไปจึงจะได้ข้อมูลช่วงถัดมาอีก 1,000 entities
  • ไม่สามารถ Sorting หรือแบ่ง Pagination ได้ ถ้าอยากทำต้อง query มาทั้งหมดแล้ว Sorting ในระบบเอาเอง หรือใช้ร่วมกับ RDBMS ตัวอื่นๆ แทน แล้วเก็บเฉพาะ partition key และ row key เพื่ออ้างอิงพ่วงกับข้อมูลที่ต้องการ Sorting จะช่วยได้มาก
  • สามารถค้นหาจาก properties ที่ไม่ใช่ partition key, row key และ timestamp ได้ จะ full table query ก็ทำได้ จากที่ลอง 1 แสน entity ก็ทำงานได้ดี (ข้อมูลประมาณ 50MB) ค้นหาด้วย properties ที่ไม่ใช่ตัวหลักของระบบ และเป็น full table query ไม่เกิน execute time
  • การ import ข้อมูลทำได้หลายแบบ ที่สะดวกที่สุดคือ csv ที่ export จาก Excel หรือฐานข้อมูลตัวอื่นๆ แค่กำหนด first line ให้เป็นชื่อ properties ที่กำลังใส่ลงไปมันจะไป map ตัว properties ในตารางให้เอง แต่  Data type มันจะเป็น String
  • ระยะเวลาในการ execute time มากสุดที่ 5 วินาที
  • ระยะเวลาในการให้ client request ไม่เกิน 30 วินาที

อันนี้คือเท่าที่ลองๆ ใช้มา

เมื่อ Linux OS Virtual Machinces บน Windows Azure ไม่มี SWAP Partition แก้ไขยังไง?

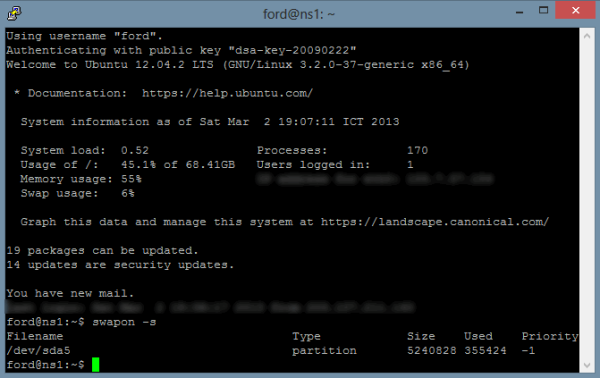
โดยปรกติแล้ว ถ้าเราลง Linux โดยทั่วไปจะมีการตั้ง SWAP Partition ไว้เป็นปรกติอยู่แล้ว อย่างเช่นตัวอย่างที่ผมเอามาโพสก็คือ Ubuntu Server 12.04.2 LTS มีการติดตั้ง SWAP ไว้อยู่

การตรวจสอบทำได้ด้วยการใช้คำสั่ง shell ด้านล่าง ซึ่งจะได้รายการ SWAP ออกมาว่ามีอยู่หรือไม่ 

ford@ns1:~$ swapon –s

2013-03-02_190758

แต่ถ้าเป็นบน Cloud นั้น ตัว Image ของ Linux OS จะถูกปรับแต่งบางส่วนเพื่อไม่ให้สร้าง SWAP พวกนี้ ด้วยเหตุผลด้านพื้นที่ที่ต้องจองไว้และความไม่จำเป็นโดยทั่วไปของ Cloud อยู่แล้ว (ปรกติใช้ Cloud สำหรับ Compute ข้อมูลที่อาจจะไม่ได้ใช้หน่วยความจำเยอะ) เพราะไม่ใช่ทุกคนที่ลง OS ต้องได้ใช้ SWAP เสมอไป แต่ถ้าอยากลงก็มีทางให้อยู่

แน่นอนว่า Cloud ที่ผมใช้อยู่นั้น อยู่บน Windows Azure สำหรับใครที่ใช้ Amazon EC2 ก็คงต้องหาวิธี ซึ่งก็มีวิธีเช่นกัน (How to add swap to Amazon EC2 instance Ununtu 12.04 LTS?)

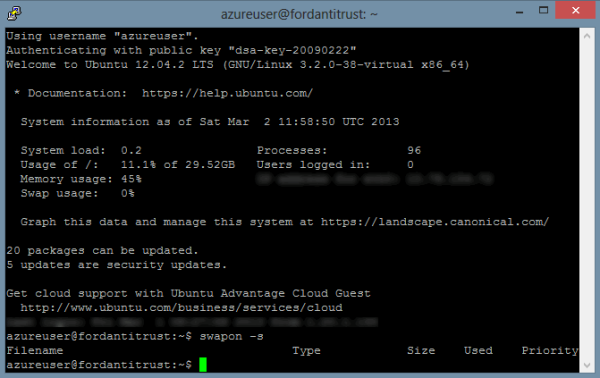
ตอนนี้ผมลองทำบน Virtual Machines ผมปัจจุบัน 1 ตัว ซึ่งเป็น Ubuntu Server 12.04.2 LTS โดยใช้คำสั่งข้างต้น ก็จะไม่เจอ SWAP แต่อย่างใด

2013-03-02_190129

อยากสร้างเรามีวิธี โดยจากคู่มือ Creating and Uploading a Virtual Hard Disk that Contains the Linux Operating System นั้นได้อ้างอิงตัว Windows Azure Linux Agent User Guide อีกทีครับ

สรุปง่ายๆ คือ เข้าไปแก้ไข Windows Azure Linux Agent Configuration ซึ่งอยู่ที่ /etc/waagent.conf (sudo ตัวเองเป็น root ก่อนแก้ไข)

เมื่อเปิดไฟล์ขึ้นมาจะตัวตั้งค่าอยู่พอสมควร ให้หาส่วนที่ขึ้นต้นด้วย ResourceDisk ซึ่งจะมีอยู่ทั้งหมด 5 ตัวครับ

ResourceDisk.Format=y
ResourceDisk.Filesystem=ext4
ResourceDisk.MountPoint=/mnt/resource
ResourceDisk.EnableSwap=n
ResourceDisk.SwapSizeMB=0

ผมจะปรับให้ใช้ SWAP ขนาด 2GB โดยปรับค่า 2 ตัวดังนี้

#เปิดการใช้ SWAP
ResourceDisk.EnableSwap=y

# 2GB หน่วยเป็น MB
ResourceDisk.SwapSizeMB=2048

เมื่อปรับแต่งตัวตั้งค่าทั้ง 2 ตัวแล้ว ก็ Save ตัวไฟล์แล้วออกจากตัว editor เสร็จแล้วสั่ง Deprovision ด้วยคำสั่งด้านล่าง

azureuser@fordantitrust:~$ waagent –force –deprovision
azureuser
@fordantitrust:~$ export HISTSIZE=0

เมื่อสั่งรันคำสั่งจบก็ exit ออกมา

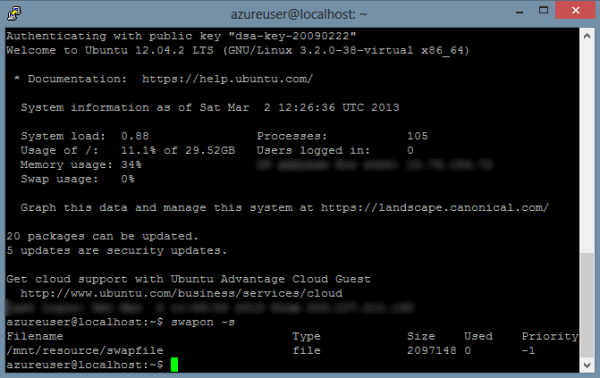
แล้วไปที่ Windows Azure Portal สั่ง Restart ตัว Virtual Machines รอสัก 3-4 นาทีโดยประมาณ ระบบจะบูทกลับมาใหม่ แล้วพิมพ์คำสั่ง swapon –s อีกรอบ จะเจอไฟล์ SWAP ของระบบอยู่ที่ /mnt/resource/swapfile

2013-03-02_192724

เพียงเท่านี้ก็จบกระบวนการ การสร้าง SWAP บน Cloud แล้วครับ

ถ้าอยากใช้ Windows Azure Virtual Machines เค้าคิดราคากันยังไง…

จาก จ่ายเท่าที่ใช้งานกับ Cloud Virtual Machines ซึ่งเป็นแนวคิดเรื่อง deploy ตัวงานขึ้น Windows Azure Virtual Machines นั้น มีหลายคนอยากรู้ว่าราคามันเท่าไหร่เมื่อคิดราคาต่อเดือน ดูตามด้านล่างได้เลยครับ

ผมเสนอแผนและราคาไปคือ Windows Azure Virtual Machines (WAVM) และ GoDaddy.com Secure Sockets Layer (SSL) เพราะเป็นงานด้านเว็บธุรกิจ มีการสื่อสารข้อมูลสำคัญเยอะ เลยมี SSL ด้วย

Windows Azure Virtual Machines (WAVM)

  • Operating System: Linux Virtual Machines (Ubuntu Server 12.04 LTS)
  • Compute: 1 x Extra small VM (Shared 1GHz CPU x 1 core, 768MB RAM)
  • Storage (Geo Redundant): 100GB (IDC Southeast Asia in Singapore and IDC East Asia in Hong Kong/China)
  • Bandwidth: 45GB/mo

GoDaddy.com Secure Sockets Layer (SSL)

  • Standard SSL
  • 1 certificate protects www.domain.com AND domain.com
  • 24/7 live support
  • SSL Installation Tool
  • Site seal options

ราคาที่คิดไว้คือ (Pricing)

  • Compute: $9.36/mo ($0.013/hr)
  • Storage: $9.50/mo
  • Bandwidth: $4.80/mo
  • Standard SSL: $69.99/yr (ถ้ามีคูปองราคาก็ถูกลงไปอีก)

รวมทั้งหมด (Total)

  • WAVM: $23.66/mo (~750Baht/mo)
  • Standard SSL: $69.99/yr (~2,100Baht/yr)

หรือตกปีละประมาณ 11,100 บาท โดยประมาณ (แต่ถ้าเพิ่ม Compute ในบางช่วง หรือัตราแลกเปลี่ยนสูงขึ้น ราคาก็แตกต่างกันไปอีก)

อ้างอิงราคาจาก (Pricing Ref.)

จะเห็นว่าราคาอาจดูสูง แต่ดู Storage (Geo Redundant) ขนาด 100GB และ Bandwidth ขนาด 45GB ต่อเดือน ก็ถือว่าเยอะเมื่อเทียบกับ Hosting โดยทั่วไป ซึ่งถ้าใช้ Storage และ Bandwidth น้อยกว่านี้ราคาก็ถูกลงไปอีก ไม่ได้จ่ายเผื่อแบบจองไว้แบบ Hosting ที่เราๆ ใช้ๆ กันแต่อย่างใด (อย่างที่บอก ใช้เท่าไหร่ จ่ายเท่านั้น) แถมถ้าเป็นช่วงแรกๆ ทดสอบระบบ Bandwidth ใช้ไม่ถึง 5GB ก็ฟรีอีก ไม่ต้องจ่ายเงินแต่อย่างใด ก็ประหยัดไปอีกครับ ลองเอาไปคำนวณเล่นๆ กันดู เผื่อคันไม้คันมืออยากลอง ตอนนี้ Azure มี Trial Account ด้วยนะ ใช้ฟรี 3 เดือน (อยู่ในข้อกำหนดที่พอเอาไปทดลองใช้งานได้สบายๆ เลย)

เมื่อ Windows Azure ไม่ให้ ping ก็ใช้ tcping แทนซิ

การ ping เป็นการใช้ ICMP ในการเรียกเข้าไปยัง Server ปลายทาง ปรกติเอาไว้ทดสอบเรื่องการตอบสนองของ Server ปลายทางว่ายังมีการตอบสนองอยู่หรือไม่ และมีความเร็วในการตอบสนองดีอยู่หรือเปล่า (พื้นฐานทั่วไปใช้ประมาณนี้)

แต่ทีนี้ Windows Azure ดันไม่ยอมให้ ICMP เข้าไปที่ Virtual Machines ด้านหลัง Firewall วิธีที่น่าจะโอเคที่สุดคือตรวจสอบด้วยการ GET ข้อมูลผ่าน TCP แทนว่า service ตัวนั้นยังเปิดใช้งานอยู่หรือไม่ ซึ่งแน่นอนว่าต้องมี service บน port ตรงนั้นก่อน แล้วเปิด Endpoint ที่ port นั้นด้วย

โดยแน่นอนว่าเครื่องมือที่ใช้ในการตรวจสอบว่า port นั้นเปิดอยู่หรือไม่นั้นก็มีเยอะนะ แต่ว่าไม่มีตัวไหนเล็กเท่ากับเจ้า tcping.exe – ping over a tcp connection (http://www.elifulkerson.com/projects/tcping.php) โดยเป็น console application ขนาดเล็ก ที่ทำงานบน Win32 Console ซึ่งทำงานได้บน Windows XP, Vista, 7 และที่ผมใช้อยู่อย่าง Windows 8 ซึ่งเจ้าตัวนี้เป็น license แบบ GPL ที่ตัวหน้าเว็บหลักมี source code ให้สำหรับเผื่อเอาไปพัฒนาต่อได้เองด้วย

ตัว tcping.exe เป็น console application เล็กๆ ที่ทำงานคล้ายๆ กับ ping แต่ทำงานบน tcp protocal ทำให้มันมีความสามารถที่มากกว่า ping ที่ใช้ๆ กันเพียงแค่ request/response ตามปรกติ

ตัว tcping.exe เองนั้น default port ที่ใช้คือ port 80 (http service)

C:\Users\Annop>tcping thaicyberpoint.com

Probing 168.63.238.30:80/tcp - Port is open - time=56.492ms
Probing 168.63.238.30:80/tcp - Port is open - time=55.441ms
Probing 168.63.238.30:80/tcp - Port is open - time=44.554ms
Probing 168.63.238.30:80/tcp - Port is open - time=62.413ms

Ping statistics for 168.63.238.30:80
4 probes sent.
4 successful, 0 failed.
Approximate trip times in milli-seconds:
Minimum = 44.554ms, Maximum = 62.413ms, Average = 54.725ms

แต่ถ้าต้องการที่จะตรวจสอบ port อื่นๆ ก็สามารถกำหนดได้ด้วยการใส่หมายเลข port อื่นๆ ต่อท้ายเอา

C:\Users\Annop>tcping thaicyberpoint.com 22

Probing 168.63.238.30:22/tcp - Port is open - time=79.934ms
Probing 168.63.238.30:22/tcp - Port is open - time=60.144ms
Probing 168.63.238.30:22/tcp - Port is open - time=67.704ms
Probing 168.63.238.30:22/tcp - Port is open - time=61.353ms

Ping statistics for 168.63.238.30:22
4 probes sent.
4 successful, 0 failed.
Approximate trip times in milli-seconds:
Minimum = 60.144ms, Maximum = 79.934ms, Average = 67.284ms

และถ้าต้องการทดสอบความเร็วอื่นๆ นอกจาก response time ปรกติ ก็ใส่ -h เข้าไป ก็ได้ข้อมูลเพิ่มเติมมาอีกพอสมควร

C:\Users\Annop>tcping -h thaicyberpoint.com
** Requesting "" from thaicyberpoint.com:
(for various reasons, kbit/s is an approximation)

Probing 168.63.238.30:80/tcp - HTTP is open - time=39.916ms rcv_time=98.247 status=302 bytes=363 kbit/s=~29.558
Probing 168.63.238.30:80/tcp - HTTP is open - time=34.371ms rcv_time=60.109 status=302 bytes=363 kbit/s=~48.312
Probing 168.63.238.30:80/tcp - HTTP is open - time=35.718ms rcv_time=100.248 status=302 bytes=363 kbit/s=~28.968
Probing 168.63.238.30:80/tcp - HTTP is open - time=36.757ms rcv_time=77.558 status=302 bytes=363 kbit/s=~37.443

Ping statistics for 168.63.238.30:80
4 probes sent.
4 successful, 0 failed.
Approximate trip times in milli-seconds:
Minimum = 34.371ms, Maximum = 39.916ms, Average = 36.691ms
Approximate download times in milli-seconds:
Minimum = 60.109ms, Maximum = 100.248ms, Average = 84.041ms

สุดท้ายก็หวังว่าหลายๆ คนที่ใช้พวก cloud service จะได้ทำความเข้าใจข้อจำกัดบางอย่างและหาวิธีแก้ไขกันเพื่อให้เราสามารถทำงานได้ต่อไปครับ

การใช้งาน (นำมาจากเว็บ project)

Usage: tcping [-t] [-d] [-i interval] [-n times] server-address [server-port]

-t   : ping continuously until stopped via control-c
-n 5 : for instance, send 5 pings
-i 5 : for instance, ping every 5 seconds
-w 100 : for instance, wait 100 milliseconds for a response
-d   : include date and time on each line
-b 1 : enable beeps (1 for on-down, 2 for on-up,
3 for on-change, 4 for always)
-r 5 : for instance, relookup the hostname every 5 pings
-s   : automatically exit on a successful ping
-v   : print version and exit
-d   : include date and time on each line

HTTP Options:
-h   : HTTP mode (use url without http:// for server-address)
-u   : include target URL on each line
-p   : use POST rather than GET (to avoid caching)

Debug Options:
-o   : use alternate timing function (less precise)
-f   : force tcping to send at least one byte

If you don't pass server-port, it defaults to 80.